

MOAC: ( Multi-Org Access Control)
Multi-Org
Access Control' (also known as 'MOAC' in short form) is an enhanced
feature of Release 12. MOAC enables users to access secured data in
multiple operating units from a single responsibility. End-Users can
access/transact data within several operating units based on a Security
Profile attached to the responsibility.
MOAC Setups
1. Define Responsibilities for GL, AP,AR,FA,CM.
2. Define Business Group.
3.Define Ledger.
4.Define Operating Unit.
5. Define Security Profile.
6. Run Security List Maintenance Program.
7. Assign Security Profile to Responsibilities.
8. Run Replicate Seed Data Program.
1. Define Responsibilities for GL, AP,AR,FA,CM.
Navigation: System Administrator --> Security --> Responsibility --> Define.
Responsibility for GL.


Responsibility for AP.

Responsibility for AR.

Responsibility for FA.

Responsibility for CM.

Setup 2: Define Business Group.
Navigation: HRMS --> Work Structures --> Oraniazation --> Description.

Select Business Group information.

Click on Ok and Save.
Once we created the business group system default assigned the business group to your HRMS Responsibility.
 Assign Business group to your HRMS Responsibility.
Navigation: System Administrator --> Profile --> Systems.


Navigation: System Administrator --> Profile --> Systems.

The ledger is a basic concept in Release 12. The ledger replaces the 11i concept of a set of books. It represents an accounting representation for one or more legal entities or for a business need such as consolidation or management reporting. Companies can now clearly and efficiently model its legal entities and their accounting representations in Release 12. This seems to be a major area in getting success of the shared service center and single instance initiatives where many or all legal entities of an enterprise are accounted for in a single instance, and data, setup, and processing must be effectively secured but also possibly shared.
Now, legal Entities can be mapped to entire Ledgers or if you account for more than one legal entity within a ledger, you can map a legal entity to balancing segments within a ledger.
While a set of books is defined by 3 C’s,
- chart of accounts
- functional currency
- accounting calendar,
This 4th C allows you to assign and manage a specific accounting method for each ledger. Therefore, when a legal entity is subject to multiple reporting requirements, separate ledgers can be used to record the accounting information.
Accounting Setup Manager is a new feature that allows you to set up your common financial setup components from a central location.
Leger is created in 5 stages
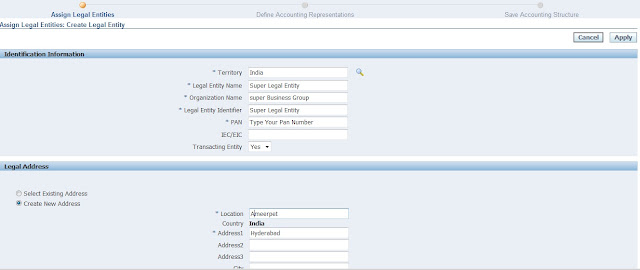
1. Create Legal Entity.
2. Define Leger.
3. Define Accounting Options.
4. Assign Legal entities to your Ledger .
5. Assign Balanceing Segment Values to respective Legal entities.

Click on Add Legal entity.
 Add your Legal entity and click on Apply.

Click on the update Balancing Segment Values

Click on Add Balancing Segment Value.

Assign Balancing segment values to these legal entities.

Click on Apply and then click onComplete.

Once you complete leger we are getting the following Warning.

Click on Yes.
Ofter click on the yes we are getting the following confirmation.

Click on Return to Accounting Setups.
Setup 4: Define Operating Unit.


 Click on ok and then submit.
Navigation: General Ledger --> Setup --> Financials --> Accounting Setup Manager --> Accounting Setups.
- Create legal entity
Click on Create Accounting Setup and then click on Create Legal entity.

Click on Apply and then click on Next.

Click on Next and then Finsh.
Define Accounting OptionsDefine Accounting Options
Click on Define Accounting Options and click on update.

Click on Next, and assign Retained earnings Account.

Click on Next, Next, and Finsh.
Assign Legal entities to your Ledger.Assign Legal entities to your Ledger.
- Define Leger

Click on Next and then Finsh.
Define Accounting OptionsDefine Accounting Options
- Define Accounting Options
Click on Define Accounting Options and click on update.

Click on Next, and assign Retained earnings Account.

Click on Next, Next, and Finsh.
Assign Legal entities to your Ledger.Assign Legal entities to your Ledger.
- Assign Legal entities to your Ledger.

Click on Add Legal entity.


- Assign Balancing segment values to legal entities

Click on Add Balancing Segment Value.

Assign Balancing segment values to these legal entities.

Click on Apply and then click onComplete.

Once you complete leger we are getting the following Warning.

Click on Yes.
Ofter click on the yes we are getting the following confirmation.

Click on Return to Accounting Setups.
Setup 4: Define Operating Unit.
How to Define Operating Unit in R12
Define Operating Unit.
An organization that uses Oracle sub ledgers, such as Oracle Cash Management, Order Management and Shipping Execution, Oracle Payable, Oracle Purchasing, Oracle Receivables, and related products. It may be a sales office, a division, or a department. Operating units are not associated with legal entities. Operating units are assigned to ledgers and a default legal context. Information is secured by operating unit for these applications using responsibilities. Each user can access, process, and report on data only for the operating units assigned to the MO: Operating Unit or MO: Security Profile profile option. The MO: Operating Unit profile option only provides access to one operating unit. The MO: Security Profile provides access to multiple operating units from a single responsibility. You can define operating units from the Define Organization window in Oracle HRMS or from Accounting Setup Manager in General Ledger. For further reference: Visit Google.com and search for "Oracle Multiple Organization Manual". download the pdf file for detailed information on multiple ORG.
Navigation: HRMS --> Work Structures --> Organization --> Description.
Click on New.

Type your operating unit name, type ,location and organization classification.

Click on Others.
Select operating unit information.

Enter the Primary Ledger name, Legal entity name and Operating unit short code

click on ok and then save.
Setup5: Define Security Profile.
The security profile determines which applicant, employee, contingent
worker and other person type records are available to holders of the
responsibility the profile is linked to.
You can define security profiles in the Security Profile window to give access
to a single business group or the Global Security Profile window (to allow
users to access records from more than one business group).
Using the Global Security Profile window does not give
Oracle HRMS users access to records from multiple business groups within the
same responsibility; users must still switch responsibilities to see records
from different business groups. However, HRMS users can see a restricted set of
information in records from more than one business group within a single
responsibility if the HR:Cross Business Profile profile option is set to Yes. In
addition, you can use people management templates to query and update worker
information across business groups using a single responsibility.
Navigation: HRMS --> Security --> Profile.

Click on Save.
Note: The above security profile will access only single business group information.
6. Run Security List Maintenance Program.

Navigation: HRMS --> Processes and Reports --> Submit Processes and Reprots ---> Single Request

Click on Ok and click on Submit.
Global Security Profile:
By using Global security Profile we can access one or more business group at a time under single Responsibility.
Navigation: HRMS --> Security --> Global.

Click On save.
Run Security List Maintenance Program.
Navigation: HRMS --> Processes and Reports --> Submit Processes and Reprots ---> Single Request

7. Assign Security Profile to Responsibilities.
Navigation: System Administrator --> Profile --> System

Click on Find.

Save.
8. Run Replicate Seed Data Program.
Navigation: System Administrator --> Request --> Run --> Single Request

Click on ok and submit.
0 comments:
Post a Comment